- Understanding How DNS Works
- Viewing DNS Records
- Adding DNS Records
- Deleting DNS Records
- Reset a DNS Zone
Understanding How DNS Works
DNS records serve as a vital source of specific information for your domain. To grasp the functioning of DNS records, you can think of them as a phone book listing. When you want to make a call, you typically refer to the phone book to find the name and contact details of the person you wish to call. The listing contains standardized information, such as their phone number, which helps you determine the right number to dial.
The way your computer, domain name servers, and DNS records work is similar. Domain name servers, acting like a phone book, store DNS records containing details like names, phone numbers, and addresses that are associated with domain names. Similar to how you use the format of a phone book listing to locate a phone number or address, DNS records provide sufficient information to route traffic to your domain such as website or email in the right direction based on the type of DNS record and the information it contains.
Before You Begin
Please note that the Zone Editor feature of cPanel will only function correctly if your domain is configured to use InMotion Hosting’s name servers. Furthermore, to manage your domain’s DNS from within cPanel, you must first add the domain to cPanel. For more information on how to add a domain to cPanel, please refer to our guide on the subject.
Viewing DNS Records
cPanel allows you to view your DNS Zone file, which contains your DNS records.
- Log into your cPanel. Be sure to log in with the cPanel user that owns the domain you are maintaining DNS records for.
- Locate the Domains section of cPanel and click on the Zone Editor icon.

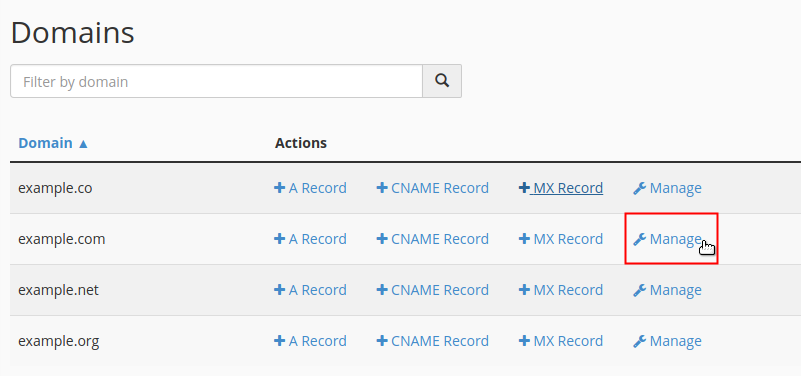
- Find your domain in the list under the Domain heading. Under the Actions heading, click on the Manage link that corresponds with the domain you want to maintain DNS for.

View Records by Type
If you are using the Zone Editor feature, please note that it can display a maximum of 100 items per page. However, for your convenience, you can filter the DNS records displayed to make it easier to view the records that you are interested in.
- On the Manage Zone page, click a record type from the Filter: list. Each page will only display the records for the specific type you selected.

View Records by Search Results
cPanel’s Zone Editor also has the ability to search and display the filtered search results.
- On the Manage Zone page, type the name of the record you would like to view into the search box that reads: Filter by name.

Adjust Page Size
Depending on the number of DNS records your zone file contains, you may need to expand or view another page of DNS records.
- On the Manage Zone page, click the Page Size drop-down menu and click to select a higher quantity. The page will refresh and display the number of records you selected.

Navigating Through a Large Zone File
If the amount of records in your zone file is higher than the maximum (100) page size, you will not be able to view all your records on one page. However, you can navigate between pages to view your records as needed.
- On the Manage Zone page, click the icon to navigate back and forward (respectively) through the pages of your DNS zone.

- Clicking on the icon will navigate you to the first and last pages, respectively.

Adding DNS Records
The Zone Editor can create common DNS records, like, A, CNAME, and MX. Through the Manage link, you can add custom DNS records, such as CAA, TXT, AAAA, and SRV records. The instructions below provide the general steps to create DNS records.
- Log into your cPanel. Be sure to log in with the cPanel user that owns the domain you are creating the DNS record for.
- Locate the Domains section of cPanel and click on the Zone Editor icon.

- Find your domain in the list under the Domain heading. Under the Actions heading, click on the Manage link that corresponds with the domain you want to create the record for.

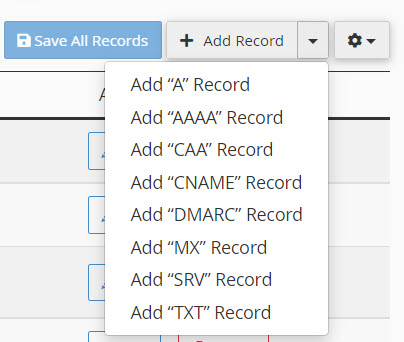
- Click the +Add Record drop-down menu button and select the record you would like to add.

- Notice the page now includes fields to enter the details for the new record at the top of the list. Enter the details of the record into the appropriate fields.

- To save your new record, click the Save Record button.
Deleting DNS Records
Deleting a DNS record for your domain is simple. Follow the steps below to learn how to do this using the Zone Editor within cPanel.
- Log into your cPanel. Be sure to log in with the cPanel user that owns the domain you are deleting the DNS record from.
- Locate the Domains section of cPanel and click on the Zone Editor icon.
- Find your domain in the list under the Domain heading. Under the Actions heading, click on the Manage link that corresponds with the domain you want to delete the record from.
- Review the list of records, find the record you want to delete, and click the Delete link next to the corresponding record.

- A pop-up dialog box appears and asks, “Are you certain that you want to delete this record?” Simply click the Continue button to confirm and proceed to delete the record.
Reset a DNS Zone
When you add a domain to cPanel, a standard set of DNS records is automatically created. If you add/delete DNS records and want to revert back to the original DNS, you can Reset the DNS Zone. This will remove all your custom DNS records and create the standard records for your domain. The instructions below provide the steps to reset your DNS zone file.
- Log into your cPanel. Be sure to log in with the cPanel user that owns the domain you are resetting the DNS zone for.
- Locate the Domains section of cPanel and click on the Zone Editor icon.
- Find your domain in the list under the Domain heading. Under the Actions heading, click on the Manage link corresponding to the DNS Zone you want to reset.
- Click on the Action drop-down menu above the left corner of the table.

- Click Reset Zone from the drop-down menu.WARNING: Resetting your zone file will delete any custom records you have made in your DNS zone file. Although the system will attempt to preserve TXT records, we recommend that you make note of any custom records you may want to save.
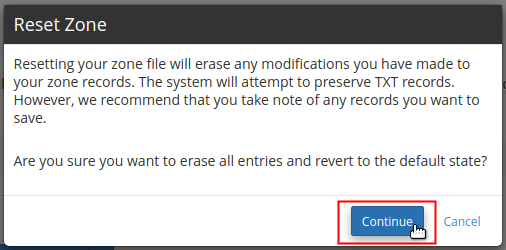
- A pop-up dialog box is displayed and asks “Are you sure you want to erase all entries and revert to the default state?” Click on the Continue button to confirm and proceed to reset the zone.

Check out our other cPanel DNS articles:
- How to Use the Track DNS Tool in cPanel
- Office 365 DNS Setup Guide
