In this article and additional tutorials on this sequence, you’ll be taught about the Git version control system and the way it’s used for managing supply code and textual content information for all kinds of functions.
More than conceptual, this text will give you a 1-2-3 getting started cheat sheet for working with Git right away.
- What is Git?
- Git, Hosted and Self-hosted
- Where to Start With Git
- The Git Three-tier Architecture
- Git in Practice: A Complete Beginner’s Guide
What is Git?
Git is an open-source cross-platform version control system. Each undertaking involving varied textual content information can have a revision historical past, and Git helps you retain observe of it.
You’ll usually hear that Git is a distributed version control system. However, what does that mean?
This system supplies a collection of instructions that provide help to observe modifications made to supply code over time in addition to deploy code to native and distant repositories. Git is “distributed” within the sense that there needn’t be one central repository for supply code, however particular person customers might “clone” the undertaking into their workstations and have all of the content material they should do their job. After they’re completed, they’ll submit their work to a shared distant repository so different folks can see what they did.
It’s simple to think of Git version control as a journal containing the detailed history of your project.
These journal entries are stored in the repository. Once you have added files to the staging index, you need to let Git know when to record these changes into the journal. Within the Git world, that is known as a “commit.”
You may consider it as making a dedication to document the changes you made in your working listing to the permanently recorded history. Once changes have been committed, they go into the repository. And you can later revisit any level of history in the repository. Every “commit” is marked with a novel identifier.
Plus, Git requires that you present a “commit message” offering some background element on what this commit consists of. This manner, Git forces you to maintain your project details, upgrades, bug fixes, and options very nicely documented.
Git, Hosted and Self-hosted
There are many popular hosting platforms obtainable for Git, such as Github and Bitbucket.
Many of those platforms supply particular options and addons built across the base functionality of Git.
Free and Open Source
Git is free and open supply software program, so you’ll be able to host your individual Git server if you wish to. It additionally works with nearly each working system.
Some hosted companies supply a self-hosted variant. GitLab presents lots of the options you’ll see in GitHub however with an optionally available self-hosted package deal you possibly can set up on a personal server.
Nonetheless, in case you are occupied with managing your individual Git repositories on a personal server, that is the tutorial sequence for you.
The place to Begin With Git
There may be a lot you are able to do with Git version control and file administration that we now have chosen to restrict this tutorial to the naked necessities.
This implies regardless that there’s rather more data obtainable about this program, you may be up and working shortly with all the things it’s good to get began utilizing Git straight away.
Whether or not you select to make use of a 3rd celebration Git internet hosting platform sooner or later, or in case you want to handle your individual repositories, on this tutorial, you’ll learn to construct and handle your repositories from the bottom up utilizing command line instruments you have already got obtainable in your laptop. We’re going to learn to provoke a repository and observe information, commit modifications, tag and signal commits, and the way to push modifications and deploy information.
Command Line or GUI
When first studying how to use Git, you have an alternative between utilizing the command line model and a graphical consumer interface (GUI) model.
On this article, we presume you’re interesting in studying the command line variant. There are certain benefits in utilizing the command line model of Git including:
- Vast help across varied platforms
- Commands keep the same no matter where you’re
- Permits for scripting and aliasing (to run favourite commands quicker)
- Helps to solidify the conceptual framework behind Git
But when for any motive you select to use a GUI, there are many fashionable open supply choice including:
- Git Kraken
- Magit (for emacs)
- Git Extensions
- GitHub Desktop
- Sourcetree
The Git Three-tier Structure
Whereas working with Git you’ll usually hear concerning the working listing, the staging index, and the repository. These ideas are essential to know from the very starting with the intention to get a correct footing in utilizing Git.
The working listing is the place all the things begins. That is the place you do your work. Information that you’re working with are situated within the working listing in your laptop. Likewise, different customers can have clones of the undertaking of their working directories.
The staging index is the place you add the information you need to observe. Monitoring information implies that Git is watching them for modifications on this particular staging space. Whenever you add information to the staging index, you’re telling Git, “Please embody this file within the checklist of information related to this undertaking and hold notice of all modifications made to it.”
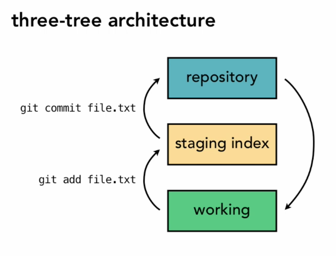
It is best to now see the complete development earlier than you: information begins within the working listing, they is added to the staging index, after which they’re dedicated to the repository. As you’ll be able to see above, information may also be “checked out” from the repository, however, that is a complicated subject that might be coated later.
Git in Follow: A Full Newbie’s Information
This part will introduce the uninitiated newbie to all of the fast Git fundamentals that wanted to begin work straight away. This can be a crash course in Git for inexperienced persons.
Do you know? You should utilize your cloud server hosting as a personal Git server.
Earlier than getting beginning, you’ll simply have to install Git. If you happen to already full the set up then you’re prepared to start.
The Working Listing
The working listing is the primary listing for the undertaking information. As you’re studying extra about Git you’ll usually hear or learn points out of the working listing. It’s principally the listing (or, folder) that comprises the information in your undertaking.
The working listing will be altered by Git. For instance, you possibly can load earlier variations of the undertaking or combine others’ code from one other department of the undertaking, and your working listing will change. This implies you should be cautious to not unintentionally overwrite information in your working listing.
In an effort to begin utilizing your working listing, all you need to do is create a listing and begin including your information to it.
Within the subsequent part, you can find out the way to instruct the Git program to begin watching this listing for modifications.
Initialize Repository
Earlier than you start your work you’ll have to “initialize” Git in your working listing, with this command:
git init
This command initializes Git performance in your working listing. However, what does that imply? Git initialization accomplishes the next:
- Units up a .git listing in your working listing
- This “hidden” listing retains observation of the information and particular reference markers wanted by the Git program
- As you get extra superiority in Git, you need to use a few of the gadgets on this listing to realize superior results, however not but
- Opens up your undertaking for Git monitoring
- This means that you can begin working Git instructions
Upon initialization, your Git undertaking is formally up and working. Now it’s good to let Git know which information to begin monitoring.
The Staging Index
Just like the working directory, the staging index is a basic idea in Git that you have to be taught and decide to reminiscence.
You may consider the staging index as a form of checklist that tells Git which information (or modifications to information) you need to commit to the repository.
You employ the staging index by invoking the git add command, for instance:
git add <name-of-file>
Or…
git add file1.php
Within the diagram beneath, suppose three pieces of information have been created within the working listing. Discover:
- The primary file has already been tracked by Git and was modified
- The second file is new to Git however was simply added, indicating that it’s a brand new file for Git to begin monitoring
- The third file has not been added to the staging index, so Git is just not conscious of it

Because of this even when a file has been beforehand added to Git for monitoring, it should be added to the staging index once more each time it’s modified, in any other case, the modifications won’t be committed to the repository.
The Repository
After getting added the information, and modifications to information, to the staging index, it’s time to create a commit for these modifications so as to add them to the repository.
The repository is the official, logged, and—generally—tagged vacation spot in your undertaking information in a single state.
You may consider the repository because of the place all of the data of the varied states of your undertaking are stored. Every notice, or mark, is termed a “commit,” as a result of it’s principally dedication to the everlasting document of the undertaking. This implies in case you’re engaged on one thing like a software program undertaking, this system needs to be in a stable working situation or no less than a considerable working state when a commit is made.
Git requires that everyone commits be made with a log entry to briefly notate the character of the commit.
Some instance commit messages is likely to be:
- “Mounted bug on the login display screen”
- “Up-to-date emphasis font”
- “Added cellphone quantity entry to kind fields”
In an effort to begin a commit, run this command:
git commit
This command, as is, will open your default textual content editor for writing in your commit message.
To skip over the textual content editor, use the -m choice and put your commit message in quotes, like so:
git commit -m "Mounted bug on login display screen"
And, conducting extra with one command, you’ll be able to add the -a choice to concurrently add all file modifications to staging index earlier than committing:
git commit -am "Mounted bug on login display screen"
The latter command demonstrates how the command line Git variant permits you to use varied choices to chain instructions collectively, thus saving somewhat time.
Branches
Lastly, as you are actually able to embark in your journey in discovering the magic of Git, it’s good to find out about how branches work.
Branches enable for limitless iteration of your undertaking information. For instance, if you wish to take a look at a brand new function or little bit of code, you’ll be able to create a separate “department” of the undertaking.
By default, each Git undertaking has a grasp department, or “upstream” department that’s meant to reference the ultimate/full model of your undertaking.
By creating branches you can also make limitless modifications to your undertaking, and commit them, with out affecting the grasp copy.
When working with branches you’ll be able to all the time swap again to the grasp department—or different branches to “checkout” the information or modifications in that department.
Nonetheless, one caveat of branches is that you could solely “take a look at” different branches from a clear state. This implies in case you have uncommitted modifications in your present department you can not checkout different branches. However in case you’re unready to commit these modifications in your present department, you’ll be able to stash them apart for later.
In an effort to see what department you’re at the moment on, you’ll be able to run the git department command by itself:
git department
If you happen to haven’t created any various branches but, you will note a list for the “grasp” department, which you’re on by default.
To create a brand new department you’ll be able to run git department adopted by the identify of the department you need to create, like so:
git department <name-of-branch>
Now once you run git department you’ll see “grasp” and the brand new department listed. Grasp will nonetheless be chosen as your lively department.
In an effort to “checkout” a special department, run the git checkout command adopted by the identify of the department you need to take a look at.
git checkout <name-of-branch>
You may test to be sure you’re on the brand new department by working git department once more to see that the brand new department is chosen/highlighted. (It’s all the time good to test your work.)
Now, discover, in case you make modifications to the information on this department, you won’t be able to modify again over to the “grasp” department except you commit your modifications or stash them.
To stash your modifications, run git stash.
git stash
Whenever you return to the brand new department, you’ll be able to unstash, or “pop,” your modifications. (Truly, you’ll be able to pop modifications on any department. See the complete information on git stash to be taught extra.)
These are the very fundamentals of Git. From there, you’ll be able to grasp your entire program as a result of you could have grounded yourself within the fundamentals. If you probably have any points or sudden errors, go away a remark beneath and the InMotion neighborhood group will attempt to assist out.