When setting up a new client, one of the first steps is to provide them with their own hosting space, which is accomplished by creating a cPanel account. As a reseller, you can do this through your Web Host Manager (WHM). Below, we’ll show you how to create a new cPanel account in your WHM dashboard.
It’s important to note that cPanel creation is no longer unlimited, and you can find more information on cPanel pricing changes by checking out the provided link. WHM access is necessary to follow this guide, and it’s included with our Dedicated Server, VPS, and Reseller Hosting plans at no additional cost.
If you’re interested in Reseller Hosting solutions, InMotion offers secure and optimized hosting that meets a range of budget needs. The slideshow below begins on step 2 and includes screenshots to guide you through the process – simply click the arrows to navigate.
 Step 8 – Click on the Create Button
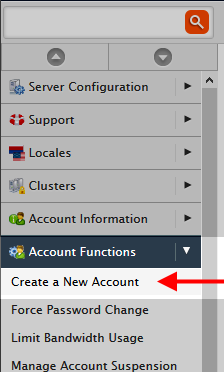
- Step 2 – Create a New Account
 Step 3 – Domain Info
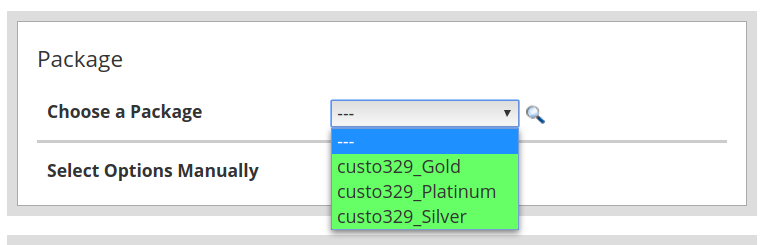 Step 4 – Choose Package
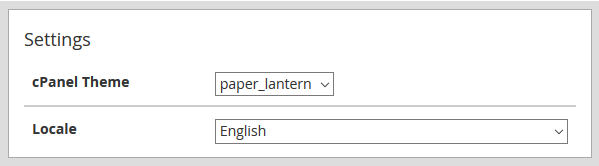 Step 5 – Choose theme and locale
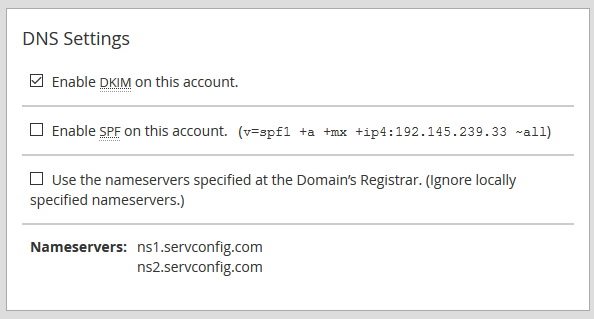 Step 6 – DNS Settings
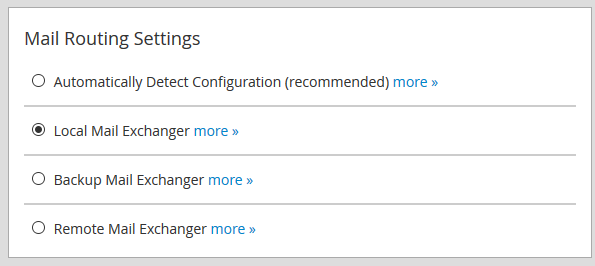 Step 7 – Mail Routing Settings
- Step 8 – Click on the Create Button
- Step 2 – Create a New Account
1 / 7
Step 2 – Create a New Account
Creating a cPanel Account in WHM
- Log into your WHM admin dashboard.
- Click on Account Functions and then Create a New Account.
- Enter your domain information:
| Domain | The primary domain name for the cPanel account. |
|---|---|
| Username | Username for logging into the cPanel. |
| Password | Password for logging into the cPanel. |
| Email address to receive cPanel account notifications. |
- To get started with creating a new cPanel account in your WHM dashboard, you’ll need to select a desired package from the dropdown. Our Reseller Hosting accounts offer three pre-configured packages that you can choose from.
- Select your default theme and locale.
| cPanel theme | Layout and design of the cPanel dashboard. |
|---|---|
| Locale | Default language for the cPanel. |
- Set your DNS Settings. For more information, see our article on SPF and DKIM settings.
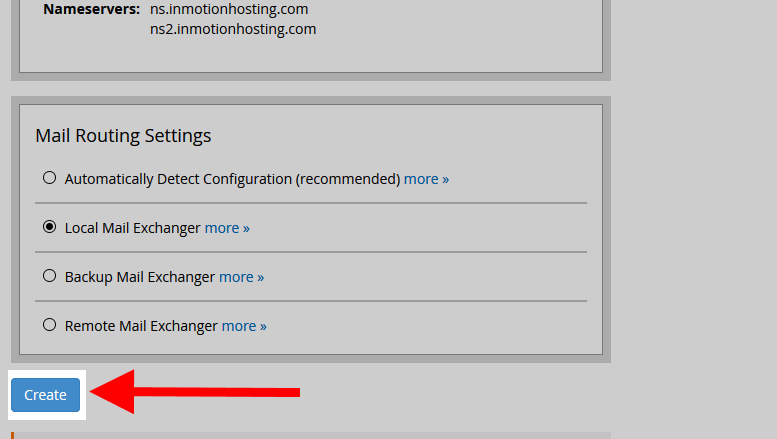
- Set the Mail Routing Settings.
| Automatically Detect Configuration | cPanel looks to the MX records to determine whether to send mail locally or remotely. |
|---|---|
| Local Mail Exchanger | Use when mail is expected to always come to the local server. |
| Backup Mail Exchanger | cPanel will use the local server if remote mail attempts fail. |
| Remote Mail Exchanger | Use when mail is expected to be sent elsewhere (third party email). |
Mail routing options
If you’re looking for information on setting up notifications for your customer email accounts, you can check out our guide on How to Configure Mailbox Quota Notifications. This will enable your customers to receive notifications when they are approaching or exceeding their mailbox size quotas.
Please note that this feature is only applicable to our VPS or Dedicated hosting customers. Our non-VPS reseller and shared server accounts have the quota notifications enabled by default.
- Click on the Create button.
Account Login Options
After creating a cPanel account in your WHM dashboard, you can log in to each account using the username and password you assigned. It’s important to note that some reseller accounts require two-factor authentication for logging in, but you can disable this feature for your customers if needed by following the steps outlined in Disabling Two-factor Authentication for Reseller Child Accounts.
You can also log in to cPanel accounts through your Reseller WHM, but be mindful of your disk usage and backups when working with accounts in Reseller. For more information, check out Working with the Backup Manager as a Reseller.
In some cases, you may need to reset passwords for cPanel accounts in WHM. Our guide can help you through this process.
Additionally, you may want to create a custom default page with your branding that appears when your customers log in. Follow the steps in How to Create a Custom Default Page for cPanel Accounts to learn how to create one.
Introducing cPanel Accounts to Your Customers
If you want to make it easy for your reseller customers to get comfortable using the cPanel interface, there are a couple of options available. One option is to use a cPanel demo account, which allows users to explore and experiment with the interface without affecting their actual account.
Alternatively, you can share our tutorial on the cPanel layout with your customers. This tutorial provides a step-by-step guide on how to navigate and utilize the various features and functions of the cPanel interface.
Managing cPanel Accounts
In addition to creating cPanel accounts, you can also use WHM to manage them. This includes setting up dedicated IP addresses for each account, as well as upgrading or downgrading their resources. You can also suspend or unsuspend accounts that have been problematic.
If you’re interested in using dedicated IP addresses for your reseller account, check out our guide on Using Dedicated IPs as a Reseller.
To create a demo or demonstration account for your customers, so they can experience the cPanel interface, follow the steps outlined in How to Create cPanel Demo Accounts.
Once you’ve set up cPanel for your customers, you may also need to create an eNomCentral account for them if they will be assisting in reselling your services. This will allow them to register domain names and manage their domain registrations through the eNomCentral interface. To create an eNomCentral account, follow the instructions provided by eNomCentral.